Texture Jungles
These Jungle Drawings, inspired by Henri Rousseau, are a great introduction to implied texture.
Kindergarteners learn three different ways to create implied texture in their art. They also gain experience drawing animals using basic shapes. This is a great project to help set up some important foundations of art with your primary-aged students!

*** This full lesson with the instructional materials is available on Teachers Pay Teachers, Classful, and Made By Teachers ***
Step 1: Introduction and Landscape Drawing
Before the lesson begins, I introduce my students to Henri Rousseau using this PowerPoint, with a special focus on his jungle landscapes. We discuss what types of things we see in his jungle landscapes.

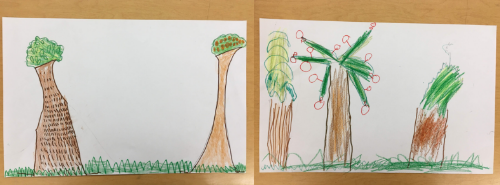
Students then begin the layout of their own jungle landscapes. Students draw a few tall tree trunks, and then add leaves to the tops of them, trying to make each tree different to reflect the biodiversity of real jungles. They can even add fruit or flowers to their trees if they wish. I use this handout to guide students in drawing a range of unique trees.

After drawing the trees, students can draw the ground, and then use colored markers to outline the trees and ground. This helps to ensure the details will not get lost when the whole picture is colored in. For the tree trunks, I love using Crayola "Colors of the World" markers for different shades of browns.
We then discuss how to create implied texture and we try out three different ways to create implied texture on our trees:
1. Draw lines with markers, and then color over the area with crayons
2. Mix together two different colored crayons
3. Color with crayon, with a texture rubbing plate under our papers.

Now students have some great techniques for creating implied texture in their artwork!
Step 2: Using Shapes to Draw Animals
One of the very first things we do in Kindergarten is practice drawing basic geometric shapes. Now, we get to apply that knowledge! I give students these drawing tutorial handouts, and we follow along with steps to draw a large cat with a circle, oval, and triangles (they can add details to make it a tiger, lion, leopard, etc.!). We then follow the steps to draw a monkey, an elephant, and birds! Colored pencils work great to color the small details of these animals.


Step 3: Final Touches
We add finishing touches like flowers or other plant life in any empty space in the landscapes. We color these smaller details using colored pencils. We use crayons to color the sky once all our details have been drawn. I encourage my students to color the whole sky, all the way to the ground. It helps if you have windows in your classroom, so you can show them that the sky really does go all the way to the ground! Some younger students struggle with coloring such a large space. In this case, I show them how to turn a small unwrapped crayon on its side to cover a large area more easily.

On this last day of the project, be prepared for some students to finish early. I like to give students this Henri Rousseau Coloring Page!
Happy Coloring!!
This full lesson plan, including the Henri Rousseau PowerPoint, the drawing trees handout, and animal drawing tutorials can all be found in my TpT Store, All About Art.
.png)


Comments
Post a Comment